IOS Push notification iOS 6 con Sencha Touch 2.2
Se state cercando di inviare una Push Notification al vostro iOS6 iPhone/iPad usando Sencha Touch 2.2 probabilmente avrete incontrato diversi problemi.
In questo articolo Giulio Roggero spiega passo per passo come configurare i certificati, impostare il file Sencha package.json e inviare una push notification con uno script PHP o C#.
Introduzione
In accordo con la documentazione Sencha è possibile abilitare l’App per le push notification con il seguente codice.
Ext.device.Push.register({
 type: Ext.device.Push.ALERT|Ext.device.Push.BADGE|Ext.device.Push.SOUND,
 success: function(token) {
   console.log('# Push notification registration successful:');
   console.log(' token: ' + token);
 },
 failure: function(error) {
   console.log('# Push notification registration unsuccessful:');
   console.log(' error: ' + error);
 },
 received: function(notifications) {
   console.log('# Push notification received:');
   console.log(' ' + JSON.stringify(notifications));
 }
});
Sembra semplice ma non bisogna farsi ingannare, la parte più farraginosa sono i certificati Apple! Infatti è necessario generare i certificati APN dal portal developer.apple.com e configurare correttamente il file package.json del progetto Sencha Touch.
Vediamolo passo per passo.
In questo tutorial assumo che siate familiari su come funzionino le Push Notifiche native. Se non lo siete seguite questo tutorial di 30 minuti, vi chiarirà molti aspetti.
Ora passiamo alla versione con Sencha Touch.
Certificati
Andare sul sito developer.apple.com dopodiché nella sezione Profiles.
Selezionare Identifiers -> App IDs -> e cliccare su Edit.
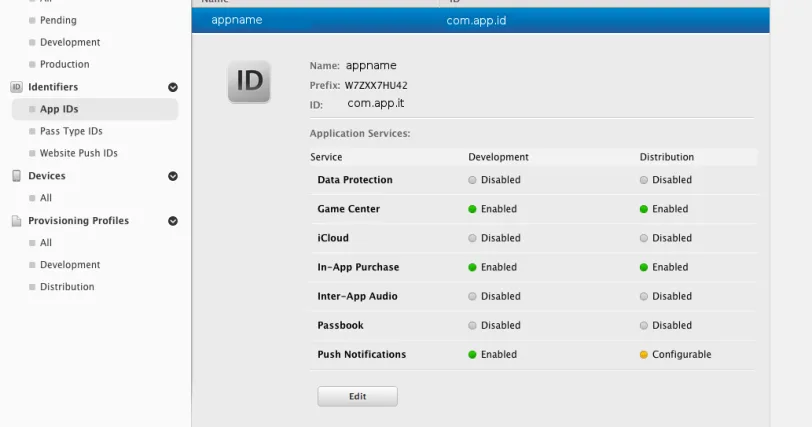
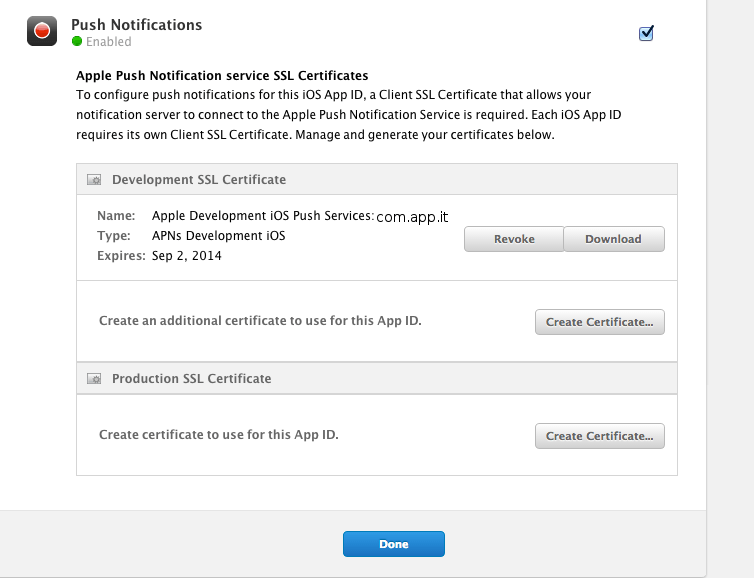
Creare il certificato di Push Notifications e scaricatelo.
In questo esempio è stato chiamato aps_development.cer.
È necessario convertirlo nel formato .pem.
openssl x509 -in aps_development.cer -inform der -out appnameCert.pem
openssl pkcs12 -nocerts -out appnameKey.pem -in appnameKey.p12
cat appnameCert.pem appnameKey.pem > ck.pem
appnameKey.p12 è la chiave privata usata per generare il certificato di push dal Mac.
È possibile esportarla usando il Keychain del Mac.
Ora è possibile inviare le push alla app.
Prima di scrivere codice è bene verificare che il certificato sia effettivamente valido.
openssl s_client -connect gateway.sandbox.push.apple.com:2195 -cert appnameCert.pem -key appnameKey.pem
Se il server Apple risponde e si può scrivere qualche carattere da terminale prima che la connessione si chiuda allora è stato fatto un buon lavoro e si è pronti per configurare Sencha.
Configure Sencha Touch
In Sencha 2.2 per configurare le push notification bisogna editare il file package.json impostando i valori come descritti nell’immagine sottostante.
Fate Attenzione a usare esattamente i nomi riportati sull’Apple Developer Portal per l’applicazione che si sta configurando.

Tenere traccia dell’applicationName, applicationId e bundleSeedId.
"applicationName": "appname",
"applicationId": "com.app.it",
"bundleSeedId": "W7ZXX7HU42",
"certificateAlias": "iPhone Developer",
"platform": "iOS",
"configuration": "Debug",
"certificatePassword": "your_pwd",
"provisionProfile": "your_provisioning_file.mobileprovision",
Tutte le altre configurazioni possono essere lasciate impostate come i valori di default.
Per abilitare l’app alle push notification si deve fare l’entitle manuale dell’app.
Di seguito l’entitle file dell’esempio.
Attenzione a
application identifier = SeedId + applicationId
In questo esempio: W7ZXX7HU42.com.app.it.
<?xml version="1.0" encoding="UTF-8"?>
<!DOCTYPE plist PUBLIC "-//Apple//DTD PLIST EN" "http://www.apple.com/DTDs/PropertyList-1.0.dtd">
<plist version="1.0">
    <dict>
        <key>application-identifier</key>
        <string>W7ZXX7HU42.com.app.it</string>
        <key>aps-environment</key>
        <string>development</string>
        <key>get-task-allow</key>
        <true/>
        <key>keychain-access-groups</key>
        <array>
            <string>W7ZXX7HU42.*</string>
        </array>
    </dict>
</plist>
NOTA: ora si è in sandbox.
Quando si dovrà pubblicare l’app in produzione bisognerà ricordarsi di cambiare aps-enviroment a production.
<key>aps-environment</key><string>production</string>
Ora tutto è pronto per compilare la app e applicare l’entitlement.
export PATH=~/bin/Sencha/Cmd/3.1.2.342:~/bin/Sencha/Cmd/3.1.2.342:~/bin/Sencha/Cmd/3.0.2.288:/Applications/Xcode.app/Contents/Developer/usr/bin/:/opt/local/sbin:/opt/ubersvn/bin:/Library/Frameworks/Python.framework/Versions/2.7/bin:/usr/bin:/bin:/usr/sbin:/sbin:/usr/local/bin:/opt/X11/bin:/usr/local/deployd/bin:/usr/local/git/bin
sencha app build native

codesign -f -dvvv -s "iPhone Developer" --entitlements entitl.plist build/appname/native/appname.app
Il file appname.app può essere installato sul device e si è pronti per ricevere le push notification in sandbox!
Push notification server
Ci sono diversi modi per inviare le notifiche push a uno smartphone.
Per questo esempio sono state adottate due soluzioni semplici e veloci, una in PHP con la classe SimplePush e una in C# con la libreria PushSharp.
Il codice PHP qui riportato usa il certificato ck.pem. Basta passare il device token e il gioco è fatto.
<?php
// Put your device token here (without spaces):
$deviceToken = 'b9a12ac7b782a1fe74cca9db1a2c511399cd9966f8f590d38975af6756112427';
// Put your private key's passphrase here:
$passphrase = 'your_pwd';
// Put your alert message here:
$message ='Grande giove!';
////////////////////////////////////////////////////////////////////////////////
$ctx = stream_context_create();
stream_context_set_option($ctx, 'ssl', 'local_cert', 'ck.pem');
stream_context_set_option($ctx, 'ssl', 'passphrase', $passphrase);
// Open a connection to the APNS server
$fp = stream_socket_client(
    'ssl://gateway.sandbox.push.apple.com:2195', $err,
    $errstr, 60, STREAM_CLIENT_CONNECT|STREAM_CLIENT_PERSISTENT, $ctx);
if (!$fp)
    exit("Failed to connect: $err $errstr" . PHP_EOL);
echo 'Connected to APNS' . PHP_EOL;
// Create the payload body
$body['aps'] = array(
    'alert' => $message,
    'sound' => 'default'
    );
// Encode the payload as JSON
$payload = json_encode($body);
// Build the binary notification
$msg = chr(0) . pack('n', 32) . pack('H*', $deviceToken) . pack('n', strlen($payload)) . $payload;
// Send it to the server
$result = fwrite($fp, $msg, strlen($msg));
if (!$result)
    echo 'Message not delivered' . PHP_EOL;
else
    echo 'Message successfully delivered' . PHP_EOL;
// Close the connection to the server
fclose($fp);
Dove si recupera il device token?
Quando Sencha si registra alle push notification lo ritorna in callback.
In alternativa questo codice per iOS6 lo visualizza.
#import "itAppDelegate.h"
@implementation itAppDelegate

- (void)dealloc
{
    [_window release];
    [super dealloc];
}

- (BOOL)application:(UIApplication *)application didFinishLaunchingWithOptions:(NSDictionary *)launchOptions
{
    // Let the device know we want to receive push notifications
    [[UIApplication sharedApplication] registerForRemoteNotificationTypes:
     (UIRemoteNotificationTypeBadge | UIRemoteNotificationTypeSound | UIRemoteNotificationTypeAlert)];

    return YES;
}

- (void)applicationWillResignActive:(UIApplication *)application
{
    // Sent when the application is about to move from active to inactive state. This can occur for certain types of temporary interruptions (such as an incoming phone call or SMS message) or when the user quits the application and it begins the transition to the background state.
    // Use this method to pause ongoing tasks, disable timers, and throttle down OpenGL ES frame rates. Games should use this method to pause the game.
}

- (void)applicationDidEnterBackground:(UIApplication *)application
{
    // Use this method to release shared resources, save user data, invalidate timers, and store enough application state information to restore your application to its current state in case it is terminated later.
    // If your application supports background execution, this method is called instead of applicationWillTerminate: when the user quits.
}

- (void)applicationWillEnterForeground:(UIApplication *)application
{
    // Called as part of the transition from the background to the inactive state; here you can undo many of the changes made on entering the background.
}

- (void)applicationDidBecomeActive:(UIApplication *)application
{
    // Restart any tasks that were paused (or not yet started) while the application was inactive. If the application was previously in the background, optionally refresh the user interface.
}

- (void)applicationWillTerminate:(UIApplication *)application
{
    // Called when the application is about to terminate. Save data if appropriate. See also applicationDidEnterBackground:.
}

- (void)application:(UIApplication*)application didRegisterForRemoteNotificationsWithDeviceToken:(NSData*)deviceToken
{
    NSLog(@"My token is: %@", deviceToken);
}

- (void)application:(UIApplication*)application didFailToRegisterForRemoteNotificationsWithError:(NSError*)error
{
    NSLog(@"Failed to get token, error: %@", error);
}

@end
PushSharp
La soluzione con PushSharp necessita la conversione del certificato in .p12
openssl x509 -in aps_development.cer -inform DER -out apn_developer_identity.pem -outform PEM
openssl pkcs12 -export -in apn_developer_identity.pem -inkey appnameKey.pem -certfile appname.certSigningRequest -name "apn_developer_identity" -out ck.p12
Ora è possibile inviare anche da C# le notifiche!
var push = new PushBroker();
String path = Path.Combine(AppDomain.CurrentDomain.BaseDirectory,".\\Resources\\certificate\\ios_cert\\ck.p12");
//Registering the Apple Service and sending an iOS Notification
var appleCert = System.IO.File.ReadAllBytes(path);
push.RegisterAppleService(new ApplePushChannelSettings(false, appleCert, "your_pwd"));
//Send a notification
push.QueueNotification(new AppleNotification()                                        .ForDeviceToken("b9a12ac7b782a1fe74cca9db1a2c559399cd9966f8f590118975af6756112427")
.WithAlert("Grande giove!")
.WithBadge(7)
.WithSound("sound.caf"));
Nota di aggiornamento al 20 agosto 2015.
Questo articolo è stato scritto un paio di anni fa. Ora le push notifications su iOS8 sono cambiate e Sencha Touch ha una procedura più semplice per abilitarle. Rimane solo il giro dei certificati che è sempre lo stesso. Prossimamente seguirà un tutorial aggiornato 🙂