Fun with Google Cloud – Book to Phrases
As a learning project carried out during a Guild, we decided to gain some experience with Google Cloud Provider (GCP). The idea was to build an infrastructure that gets a book in TXT format, parses it into phrases, adds some information to each phrase, stores it, and exposes it on a simple HTML page.
In this article I will explain what we have done for the project and how to install it.
Introduction
Since the goal of this project was to gain experience and knowledge about GCP, we made certain technology choices specifically to try out services and, why not, to have some fun.
The project infrastructure
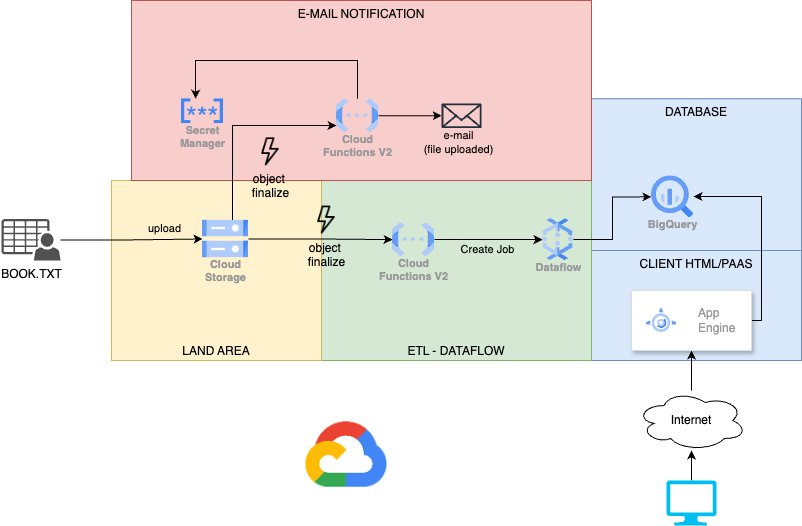
The project provides a storage where one or more books in .txt format can be uploaded. Once the upload is complete, the system sends a confirmation e-mail and starts processing the file. This process involves dividing the book into individual sentences, then saving each sentence in a database along with information such as the number of words and characters in each sentence.
There will also be an HTML page that allows querying this database and displaying the results. Finally, we created a Terraform script to recreate the entire infrastructure from scratch (Infrastructure as Code or IaC).
Below you can see the project diagram:
Google Cloud Provider services
Land area
Google Cloud Provider resources:
- Cloud Storage
For the “Land area” where files can be uploaded, we used GCP’s Cloud Storage.
This service is ideal for file storage due to its low costs and provides a series of events (in our case, “object finalize”) that allow us to trigger other Google services.
E-mail notification
Google Cloud Provider resources:
- Cloud Function (Node.Js)
- Secret Manager
- Service Account
- roles/run.invoker
- roles/eventarc.eventReceiver
- roles/artifactregistry.reader
- roles/secretmanager.secretAccessor
For the notification part, we used a Cloud Function written in Node.js that relies on an external service (SendGrid). Since it is necessary to pass the SendGrid credentials to the function, we decided to store this sensitive data within a Secret Manager.
Finally, we created a Service Account with the necessary roles to allow the Cloud Function to perform all operations and subscribed the Cloud Function to the “object finalize” event generated by the Land Area storage so that it triggers when a new file is uploaded.
So, every time we upload a new file on the land area bucket the system will send an e-mail notification like this one:

ETL – DataFlow
Google Cloud Provider resources:
- Cloud Function (Java)
- DataFlow – Flexible Template
- DataFlow – Batch
- Service Account (Per CloudFunction)
- roles/run.invoker
- roles/eventarc.eventReceiver
- roles/artifactregistry.reader
- roles/dataflow.admin
- roles/storage.objectUser
- roles/storage.admin
- Service Account (Per DataFlow Job)
- roles/artifactregistry.reader
- roles/dataflow.worker
- roles/bigquery.dataEditor
- roles/storage.objectUser
 Dataflow is a serverless service by Google that enables data processing in either stream or batch mode using Apache Beam. Initially, we used Dataflow in streaming mode. However, this incurs continuous expenses as the process remains always active awaiting data. Since the expected input involves manually uploading files, making the ingestion process intermittent, we opted to switch to batch mode. We employ a Cloud Function to trigger the job, ensuring payment only for actual processing consumption.
The Dataflow process takes the uploaded file, e.g. Load file – step 1 and Load file – step 2 split it into sentences (Parse file), calculate the number of words and characters for each sentence (Load phrase info), and save the results to BigQuery (Write phrases into BigQuery). Google’s interface displays statistics for each processing step, as seen in the adjacent image.
We also created two different service accounts, one for the Cloud Function and one for the Dataflow Job.
Database
Google Cloud Provider resources:
- BigQuery
- Dataset
- Table
- Dataset
Google BigQuery is an affordable, fully managed enterprise data warehouse on a petabyte scale for analysis.
In our case, we will use it as a simple SQL database with one dataset and a single table. This platform offers some free tiers, so for our project, it should be a cost-effective solution.
Client HTML/PAAS
Google Cloud Provider resources:
- AppEngine Application
- AppEngine Service
- Service Account
- roles/bigquery.dataViewer
- roles/bigquery.jobUser
AppEngine is a fully managed, serverless platform for developing and hosting web applications at scale. It offers some cool features like the split traffic feature (aka canary release).
We’ve built a straightforward Node.js web server that exposes an endpoint querying the BigQuery table and returns an HTML table that lists about 100 random rows (the random query helps avoid BigQuery caching). This application requires a service account with roles allowing it to read data from BigQuery.
Extra services
- Cloud storage: used to store all temporary or build files required by various services to compile and run the published code.
- Cloud Build: regarding Cloud Functions, Terraform only publishes the code, which is then compiled directly in the cloud by the Cloud Build service.
- Artifact Registry: Compiled Cloud Functions generate a Docker image that is stored here.
Terraform
The entire infrastructure described in this article can be easily deployed using the Terraform project available in this repository.
Structure
Each Terraform folder uses the same file structure:
- main.tf: Terraform scripts that create the resources;
- outputs.tf (optional): contains all the outputs of the module;
- providers.tf: the providers used by the scripts;
- variables.tf: contains all the variables used in the scripts;
- modules/: this folder contains all the modules used in the scripts. Each module follows the same file structure.
main.tf
The main.tf file in the root directory is used to enable the required GCP services, create the “Land area” bucket, create a temporary bucket used by a few services to store builds, and import all the sub-modules.
variables.tf
As mentioned before, this file contains all the input variables of the project:
- project: [Required] The Google Cloud Provider project ID where all resources will be installed.
- location: [Default: europe-west8] The cloud zone where all resources will be installed.
- app_engine_location: [Default: europe-west6] The location of the AppEngine application (check availability before editing).
- sendgrid_api_key: [Required] The SendGrid API key.
- mail_sender: [Required] The e-mail sender.
- mail_receiver: [Required] The e-mail receiver.
- dataflow_batch_image: [Default: th3nu11/dataflow-booktophrases] The Docker image used by Dataflow.
Module: storage-notifier
The storage-notifier module (located in modules/storage-notifier) installs all resources explained in the “E-mail notification” section. The source of the Cloud Function (Node.js) can be found under the function-source folder.
Module: dataflow-template
This module (located in modules/dataflow-template) creates the Dataflow template and generates a JSON file in the temporary bucket with the template definition.
NOTE: Since it is not possible to create the Dataflow template via a Terraform script, we utilize a previously published Docker image (the image name can be configured through Terraform variables). You can check the code here.
Module: dataflow-job-batch
This module (located in modules/dataflow-job-batch) creates the cloud function that will run the dataflow job using the template created by the dataflow-template module.
The source of the function (Java) is in the dataflow-job-runner-fn-source folder.
Module: bq-table
This module (located in modules/bq-table) creates all BigQuery resources as explained in the “Database” section.
Module: app-engine
The app-engine module (located in modules/app-engine) creates the “Client HTML/PAAS” using the Google Cloud Provider AppEngine service.
It sets up the AppEngine application with the default service. The code, located in the source folder, is a simple Node.js application that queries the BigQuery database and returns an HTML table with the results.
NOTE: If the AppEngine application already exists in GCP project, then the script will fail.
How to run the project
Requirements
The requirements of this project are the following:
- Account Google Cloud Provider
- Google project
- SendGrid Account (optional, you can skip this part if you are not interested in the e-mail notification part)
- Installed tools (The Google Cloud Shell has already these tools installed)
- Terraform
- gcloud CLI
Install scripts
As written before in this article, everything we built can be created by Terraform scripts that you can find here.
From the terminal, navigate to the Terraform folder, initialize the variables (using the prefix TF_VAR_), and execute the following Terraform commands:
export TF_VAR_project ="your project id, where you want create the resources"

export TF_VAR_sendgrid_api_key="the sendgrid key"

export TF_VAR_mail_sender="the mail sender used to send the notification, it is the one you’ve registered in send grid"

export TF_VAR_mail_receiver="the email where you want receive the notification"
NOTE: If the AppEngine application already exists in GCP project, then the script will fail.
After the terraform apply command, Terraform will show you the plan or, in other words, the list of the GCP resources that the script is going to create, waiting for you confirmation to proceed.
As soon as the script completes its job, it will print out two variables:
- The URL of Land area bucket
- The URL of the AppEngine Web app

NOTE: Since the script enables the required APIs and some APIs take a while to be activated, the first time you run the script you might encounter errors saying that an API is not enabled.
Example:
In this case, it is enough to wait for a few seconds and then restart the script.
To destroy all resources is enough execute terraform destroy command.
Project cost simulation
We set up the infrastructure in a new GCP project, uploaded approximately 60 MB of books, and configured it to load the HTML page from different countries every minute using GCP Uptime Check from another project.
Expectations
All the services we’ve chosen are pay-as-you-go, so costs should be limited. Some of these services, such as Cloud Functions and Dataflow, are only used during the initial phase when we load all the books. This first phase is hard to estimate precisely, but after it concludes, these services are no longer needed. Therefore, we only expect expenses on the first day.
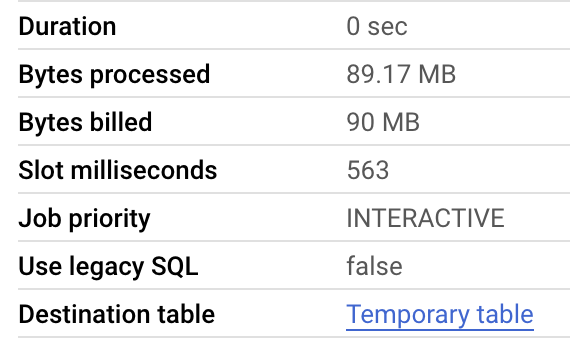
The next phase involves reading and displaying data. Our UI, hosted on AppEngine, queries the database, returning about 100 random rows each time (the random query helps avoid BigQuery caching). Each query consumes approximately 90 MB of data.

Using the UpCheckTime service (configured in a different project, so its cost is not included in this report), we load the UI five times per minute, with each request coming from a different country. For BigQuery, we expect to exceed the free tier (the first 1 TiB per month is free, then $7.81 per TiB).
With 5 requests per minute, 1440 minutes per day, and 90 MB per query, we expect around 648 GB of data usage per day. Over a week, this amounts to an estimated $28 for BigQuery alone.
Regarding App Engine, we expect low costs since the uptime and data transmitted are minimal, with perhaps some minor network costs.
Results

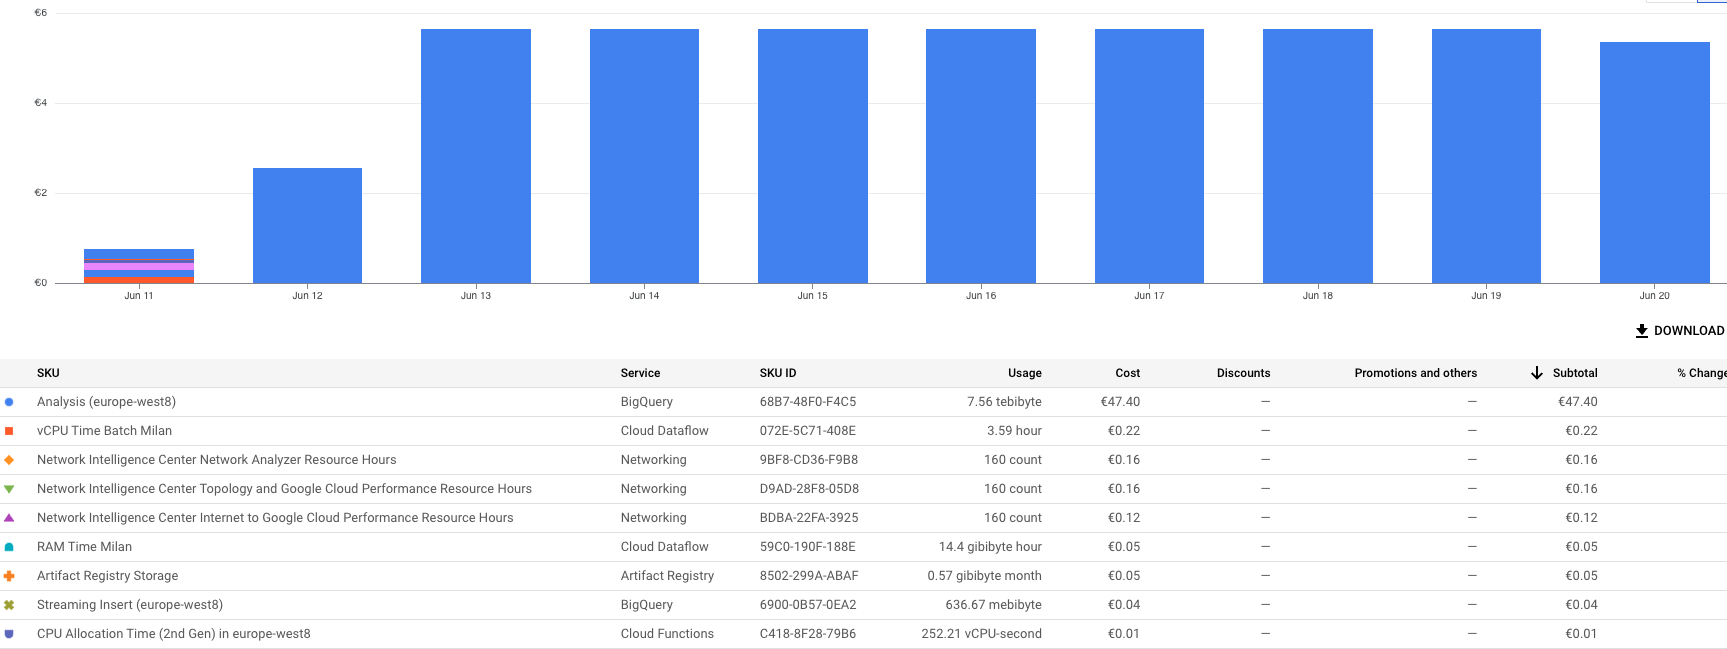
As expected, after the first two days, the cost stabilized, and BigQuery is the only resource incurring a cost due to the random data that invalidates the cache. I anticipated some networking or AppEngine costs, but there are none.
Conclusions
We started with very limited knowledge about some services, but GCP offers excellent tutorials (some of which are interactive) and numerous examples for inspiration. Plus, the free credit for new accounts is very helpful for conducting experiments. The journey was quite smooth overall. However, the most challenging aspect for us is accurately estimating costs, especially for serverless services that are billed based on usage.

